

Use Turbo Notify in n8n
The Turbo Notify community node sends and receives WhatsApp messages from n8n workflows: texts, images, documents, locations, contact cards, replies and reactions, delivery status, and a trigger for incoming messages. It also works as a tool for an n8n AI Agent.
The node needs three things, and none of them is in n8n: an account, a connected number and an API key. Keep the phone with your WhatsApp at hand for the second one.
1. Create the account
Section titled “1. Create the account”Create a free account at dashboard.turbonotify.com. If you already have one, sign in.
2. Connect your number
Section titled “2. Connect your number”- In the dashboard, open Numbers (opens in a new tab) and, on the Main number card, click Connect main number.
- Choose QR code or Pairing code.
- On the phone, open WhatsApp at Linked devices > Link a device and scan the QR code or type the pairing code.
Turbo Notify links your own number as a linked device, the same way WhatsApp Web does. It is an independent service, not affiliated with Meta, and it does not use the WhatsApp Business Platform API. The steps are the same as in the quickstart. Without a connected number every send is refused with number_not_connected.
3. Create an API key
Section titled “3. Create an API key”Open API keys (opens in a new tab), create a key and pick the template AI agent (MCP). The name refers to the MCP server, but the permissions it selects are exactly the ones the node uses. A workflow that only sends can use Transactional notifications. The value is shown once: copy it. More in API key.
4. Install the node
Section titled “4. Install the node”In n8n, open Settings > Community nodes, choose Install and enter @turbo-notify/n8n-nodes-turbo-notify. On n8n Cloud the node appears in the nodes panel once n8n has verified the package. The source and the example workflows are on GitHub (opens in a new tab).
5. Create the credential
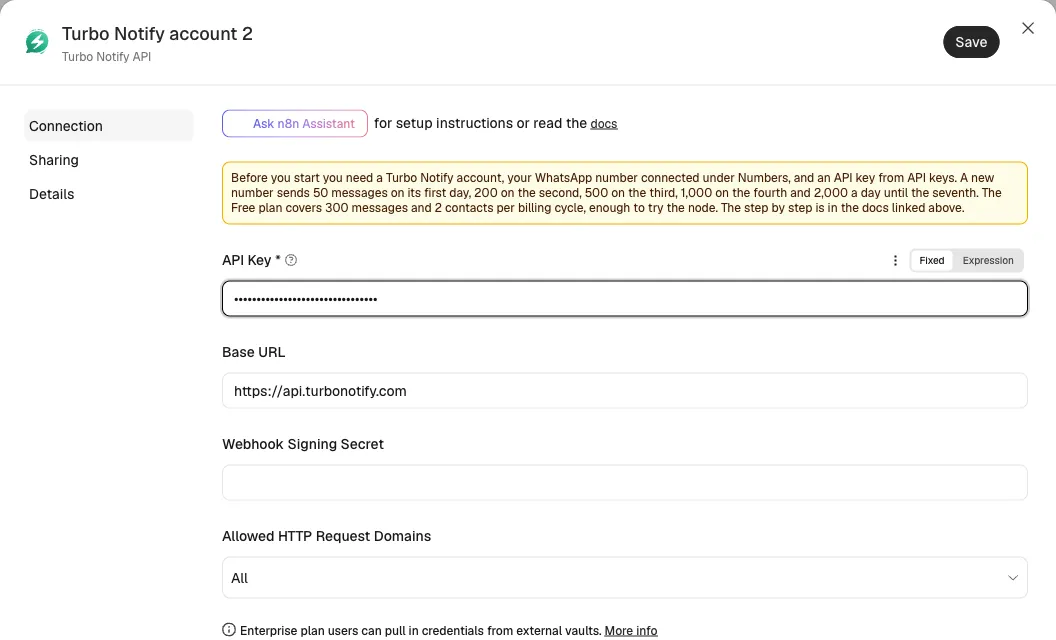
Section titled “5. Create the credential”Add a Turbo Notify node and, under Credential, create a Turbo Notify API credential. Paste the key into API Key and leave Base URL as it is. When you save, n8n checks the key.
6. Send the first message
Section titled “6. Send the first message”- Keep Resource on Message and Operation on Send Text. Number is
main. - Under Phone Number type your own number with the country code and a
+, for example+5511977770001. Write something under Text. - Select Execute step.
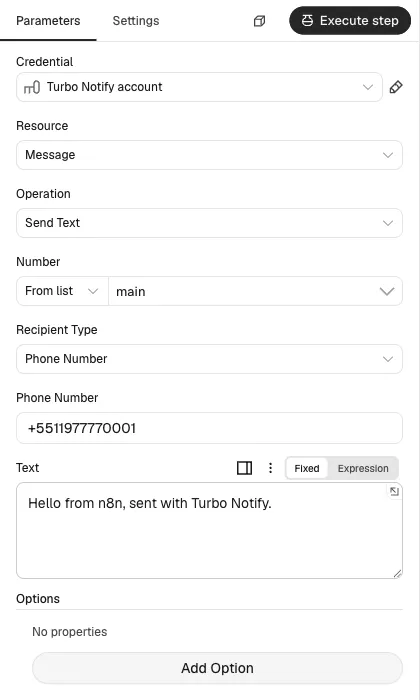
The answer says pending: Turbo Notify accepted the message. Delivery and reading arrive later, and the Get Status operation reads them. To start from a workflow that is ready, import send-first-message.json from the examples folder of the repository.
Limits at the start
Section titled “Limits at the start”Test with a few messages first. Two limits apply to every send, and the smaller one stops you:
- The age of the number. In its first seven days a number sends a limited volume a day, on every plan. The table is below.
- Your plan. Each plan has its own allowance of messages and contacts for the billing cycle, and its own pace between sends. They are listed in Quota and usage and your own are under Billing (opens in a new tab) in the dashboard. The Free plan has the smallest ones, enough to try the node, not to send a list.
The node reads yours: Message > Get Quota returns how many messages the number can still send in this cycle.
A new number sends a limited volume a day so WhatsApp does not treat it as suspicious:
| Age of the number | Messages per day |
|---|---|
| First day | 50 |
| Second day | 200 |
| Third day | 500 |
| Fourth day | 1,000 |
| Days 5 to 7 | 2,000 |
| After 7 days | only your plan limits apply |
The count starts again at midnight UTC. When a number reaches the limit, the node stops with warmup_limit_exceeded and says how long is left. More in Rate limits and Quota and usage.
Start a workflow from a message
Section titled “Start a workflow from a message”To start a workflow when a message arrives, add Turbo Notify Polling (every plan, one minute at the shortest) or the instant Turbo Notify trigger (Lone Wolf plan or higher, needs an address on the internet). The page Triggers shows how to choose and set up each one.
When something stops
Section titled “When something stops”The node stops with the reason and what to change. The most common ones:
| Code | What to do |
|---|---|
not_authenticated | The key is wrong, revoked or expired. Create a new one under API keys. |
number_not_connected | Reconnect the number under Numbers. |
warmup_limit_exceeded | A new number reached its daily volume. Wait for midnight UTC. |
contact_quota_exceeded, messages_quota_exceeded | The Free plan allowance for the cycle is used up. It resets when the cycle turns, or when you change the plan under Billing. |
send_rate_spacing | Too fast for the plan. The node waits and tries again up to 3 times. |
All codes are in the error reference.
Keep going
Section titled “Keep going”- Operations of the node: every operation, its fields and what the next node receives.
- Triggers: the Polling Trigger and the instant trigger, step by step.
- Ready-made workflows: files to import, and the node inside an n8n AI Agent.