

Ready-made n8n workflows
Each workflow below is a file you import into n8n. In the workflow menu choose Import from File, then choose your credential in each Turbo Notify node. The phone numbers in the files are made up: use your own. The files are in the examples folder (opens in a new tab) of the repository.
Install the node and create the credential first: see Use Turbo Notify in n8n.
Send a first message
Section titled “Send a first message”File: send-first-message.json (opens in a new tab)
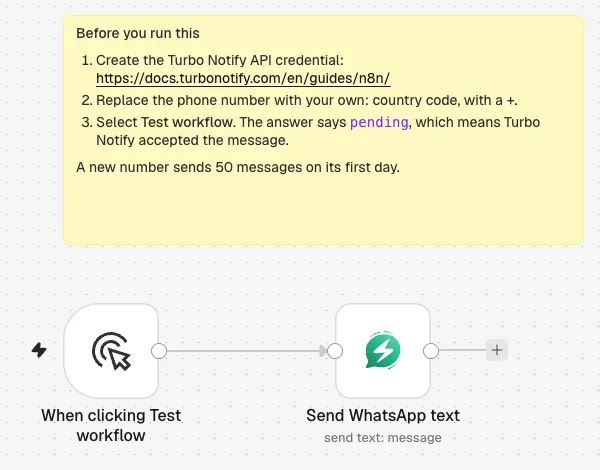
A manual trigger and one Send Text step. Change the phone number, select Execute step, and the answer says pending. Plan: any.
Answer private messages
Section titled “Answer private messages”File: answer-private-messages.json (opens in a new tab)
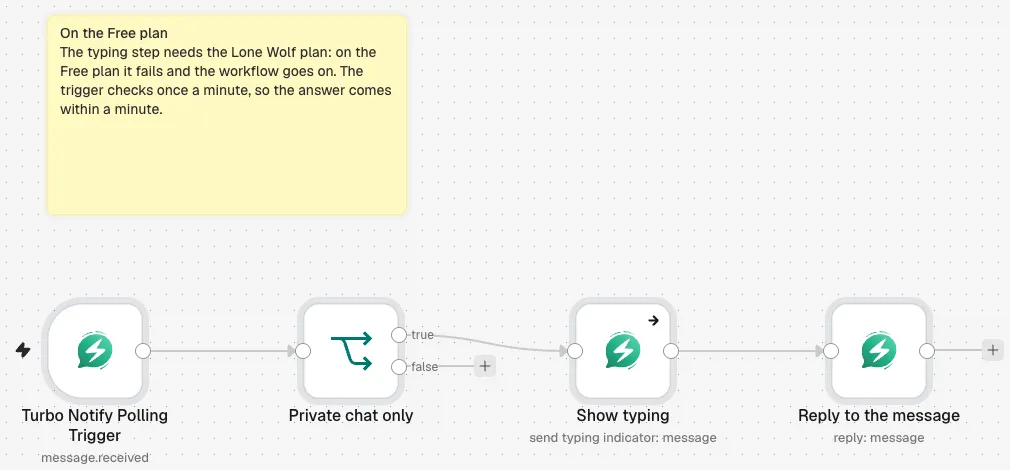
The Polling Trigger starts on every received message. An If step skips groups, Send Typing Indicator shows “typing”, and Reply answers the message, quoting it. Change the text of the reply to what your business says.
Plan: any. The typing step needs the Lone Wolf plan or higher: on the Free plan it fails and the workflow goes on.
Answer with an AI model
Section titled “Answer with an AI model”File: answer-with-ai.json (opens in a new tab)
The same flow, with two steps more. Message > Get reads the whole message (the trigger only carries the first 50 characters), and a step marked “Your AI step” is where you plug in your AI model. The reply uses what that step writes. Replace the step with an AI Agent or a model node of your choice.
Plan: any. The typing step needs Lone Wolf, as above.
Send a different notice to every row of a list
Section titled “Send a different notice to every row of a list”File: notices-from-a-list.json (opens in a new tab)
A Code step with a few rows (name, phone, amount) feeds Send Text, which builds each text from the row. Replace the Code step with your sheet or database. The node runs once for each row, spaces the sends for the plan and checks every row before it sends the first one.
Test with a few rows first. A number connected today sends 50 messages the first day: see the limits at the start.
Check that a message arrived
Section titled “Check that a message arrived”File: check-delivery.json (opens in a new tab)
Send Text, a Wait, then Get Status. An If step branches when the status is failed. Put your own steps on each branch: warn someone, try another channel or write the row to a sheet.
Send a message when a form is submitted
Section titled “Send a message when a form is submitted”File: form-to-whatsapp.json (opens in a new tab)
An n8n form starts the workflow and Send Text thanks the person on WhatsApp. Ask for the phone number in the form with the country code, and build the value with {{ '+' + $json.phone }} if the field has digits only.
Patterns
Section titled “Patterns”Send a file
Section titled “Send a file”The API takes a public HTTPS address, never the file itself, so there is no binary input. Upload the file with the n8n node of your storage (S3, R2, Google Drive, Dropbox), create a link that stays valid for a few minutes, and map it to Media URL in Send Media. Turbo Notify downloads it before sending. Files can be up to 16 MB (image, audio) or 100 MB (video, document).
Ask a question and wait for the answer
Section titled “Ask a question and wait for the answer”Two ways:
- Send a message with Send Link Button whose button opens
{{ $execution.resumeUrl }}, then add a Wait node set to resume on a webhook call. - Start a second workflow with a trigger on
message.received, and match the sender.
Answer once per customer
Section titled “Answer once per customer”Under Options, give Idempotency Key a value that identifies the thing the message is about, such as the order number. A repeat of the same run never sends the message twice. See sending many messages.
Use Turbo Notify from an n8n AI Agent
Section titled “Use Turbo Notify from an n8n AI Agent”There are two ways to give an n8n AI Agent access to your WhatsApp.
1. The node as a tool
Section titled “1. The node as a tool”Connect the Turbo Notify node to the Tools input of an AI Agent node.
- Use one tool node per job and rename it, for example
send_whatsapp_text. Write its description yourself, because every Turbo Notify tool otherwise shares the same text. - Set Recipient Type to Auto-Detect and let the agent fill To and Text with
$fromAI('to', ...)and$fromAI('text', ...). - Give the agent its own idempotency key if a retried call must not send twice. Each call of a tool counts as a new run.
pendingis not delivered: the agent should not tell a customer that a message arrived.
On a self-hosted n8n, community nodes work as tools only when N8N_COMMUNITY_PACKAGES_ALLOW_TOOL_USAGE=true is set. A managed plan may not allow it.
2. The MCP server
Section titled “2. The MCP server”The MCP Client Tool node of n8n can connect to the Turbo Notify MCP server, which offers the same API as ready-made tools with descriptions written for agents. In the MCP Client Tool node:
- Endpoint:
https://mcp.turbonotify.com. It speaks Streamable HTTP, so use an n8n version whose MCP Client Tool offers that transport. - Authentication: Bearer Auth, with a credential whose token is a Turbo Notify API key. The AI agent (MCP) template fits.
Use the node for steps you want fixed in the workflow, and the MCP server when the agent decides what to do. The connection is described in the MCP server guide.